Find Me on Facebook!

Tuesday, February 5, 2013

Peanut Butter S'mores Bar


Ok, I have to admit after reading that title, what could be wrong with this delicious sounding baked item.  Nothing, I think.  It has all the key items... Peanut Butter, Chocolate, and Marshmallow.  Just the thought of all of them baked together into an ooey gooey mess.... mmmmm.

Oh, huh?

 Sorry about that.  I was just thinking and I started to go bleary eyed.

Ok, back to the now. I found the recipe on Pinterest. (Yes, I know I have been finding a few things there recently, but in my defense it is a great source for many things.)  Anyway, the woman's blog that I found actually adapted the recipe from two different sources.  Here is the one I used and is also has the links to the other recipe... The Sweet Life

Overall, the bars turned out great and tasted divine.  I did have a few issues with it though.  I know how could I with all ooey gooey goodness.  But, alas I did.  And in all fairness it was not with the taste as much as it was in the making and execution.  My biggest problem was the graham cracker "dough"  was very sticky.  And I mean very sticky.  I know the easy solution to this is adding more flour, but will need to be careful not to add too much.  The only other issue was with the dough again.  The recipe called for the use of a 8x8 pan and divide the dough.  Well, if I barely filled the bottom of the pan and was only able to cover about 2/3 of the top.  Now because the dough did not completely cover all the marshmallow, those spots were nicely toasted, which is not too bad.  I feel an easy solution to this is just doubling the dough ingredients.  Another thought I had that might work would be maybe just using a PB cookie dough and if you still wanted some graham cracker flavor just evenly swap out flour for the crackers.

So, what do you think?


This will absolutely be something I will make again.  Hopefully sooner then later.  Hope you try it out for yourself.

Until next time..... Happy Baking!

Sunday, January 13, 2013

Lemon Blueberry Loaf

Last Spring my family and I decided that we wanted to go pick fresh fruit.  After some searching I was able to find a few local farmers that allowed fresh picking.  At the time my daughter was going through a blueberry kick, so it was decided where we were going.  We had a great time and probably picked about 3 pounds of fresh blueberries.  Now, of course I needed to fine something make using the berries.  I came across a recipe on Pinterest.  Here is the direct link:  Sweet Pea's Kitchen.

My version

The only thing that I didn't do was add the lemon glaze, but even without it was still delicious.  I still have plenty of blueberries.  I know I will be making this again.  Maybe next time I will add the glaze.  If I do, I'll be sure to let you all know how it turns out.

If you happened to check out the Sweet Pea's Kitchen website, you may seen that there were other recipes for similar loaves/cakes.  For the record I have also made the Orange Pound Cake.  That was just as good.  That version I did use the glaze.  All I will say is yum!


I am not sure which I will try next.  Maybe just the plain lemon.  But, I doubt it will be "plain".

Until next time....... Happy Baking!


Tuesday, January 8, 2013

Pumpkin White Chocolate Muffins

I have a confession to make..... I am not a big fan of anything that is made with pumpkin.  I can't lie I have carved enough of them over the years and saw the lovely ooey gooey insides that it didn't help with my aversion to pumpkin-made things.  So, unless I asked to make them for something I didn't, until recently.

I was discussing with my husband want he wanted me to make for Thanksgiving dinner.  He had this look like he wanted a pumpkin pie, but he knew it would be a waste to make an entire pie just for him.  I told him I would see what I could find on the internet.  I thought I could find something that was a mini version or something similar.  I figured it wouldn't be hard since I have found recipes for mini cheesecakes and individual pineapple upside down cakes.  I didn't search long before I found a recipe for muffins.  I found it originally on Pinterest, then found the original post on Culinary Concoctions by Peabody.  Here is the direct link to the web page....  http://www.culinaryconcoctionsbypeabody.com/2012/09/04/pumpkin-white-chocolate-chip-muffins/

If you don't feel like going over the page here is the recipe:


Pumpkin White Chocolate Chip Muffins

1/2 cup of walnuts, chopped
1 2/3 cup all-purpose flour
1 cup granulated sugar
1 tsp ground cinnamon
1/2 tsp ground ginger
1/2 tsp ground cloves
1 tsp ground nutmeg
1 tsp baking soda
1/4 tsp baking powder
1/4 tsp salt
2 eggs
1 cup pumpkin
1 tsp. vanilla bean paste
4 oz unsalted butter, melted
6 oz white chocolate chips
1. Preheat oven to 350F.
2. In a large bowl, mix the flour, sugar, spices, baking soda, baking powder and salt.
3. In another bowl, mix together the eggs, vanilla bean paste, pumpkin, and unsalted butter. Add in the chocolate chips and nuts.
4. Combine the wet and dry ingredients and mix until the dry ingredients are moistened. Do not over mix.
5. Scoop batter into greased or paper cup lined muffin cups. Bake for about 20-22 minutes or until puffed and springy to the touch. Cool then remove from cups. Makes 12 muffins
.
I only made a few slight adjustments to fit my needs.  First was I didn't add the walnuts.  Truth, I just don't care for baked goods with nuts in them.  The second item I changed was the vanilla bean paste.  I just used pure vanilla extracted.  I did this mainly because I didn't know what vanilla bean paste was or how to make it.  The extract worked just fine in my opinion.  One thing I found out was if you use regular muffin tins, you can get about 18 muffins instead of 12.
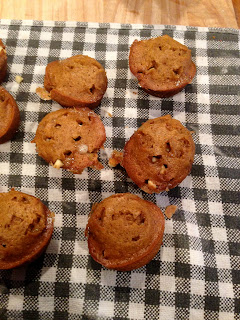
This is a picture of one the many batches I made.

Ok, I will admit these muffins have definitely changed my mind about pumpkin.  They were soooo good.  The white chocolate gave them a very nice sweet taste.  They have been something I have made several batches.  They even have made me think of trying some more things with pumpkin.  I guess I need to hit the internet again and see what I can find.

Next time I will talk about a blueberry lemon loaf that I tested out with some very good results.

Until next time...... Happy Baking!

Friday, January 4, 2013

Meringue Cookies

Happy New Years, Everyone!

I know, I know, it has been way too long since my last post.  I hope you can all forgive me.  I won't bore you with the details, but I believe I finally was able to make some order to the chaos that was my life.  With that said, I hoping to come to at least twice a week to begin.  (I must take baby steps, don't want to get overwhelmed again.)  So, without further ado, here is my latest addition.....

After all the indulging over the holidays I decided to make something that is fat free and relatively low calorie..... meringue cookies.

I have not made these in quite some time.  They actually very simple to make.  The hardest part is just letting the egg whites mix.  I do strongly suggest that you use a stand mixer, but then again it could give you a very good arm workout.

This is the recipe I use:

2 egg whites
1/8 tsp cream of tartar
1/8 almond extract
1/2 cup sugar

1) Preheat oven to 225.  Line cookie sheet with foil or parchment paper.  If you use foil make sure you spray it lightly with cooking spray.

2) Combine egg white and cream of tartar, beat until foamy.  Then add extract and sugar 1 tablespoon at a time.  Beating constantly at high speed for about 4 to 6 minutes until the sugar is fully dissolved.  The whites should be glossy and form stiff peaks.

3) Spoon the meringue into a pastry bag with any tip you want or a plastic storage bag and cut a corner off.

4) Pipe meringue onto cookie sheets.  You can make them as small or as big as you want.

5) Bake in oven for at least 1 1/2 hours.  After baking, turn off the oven and leave the cookies in the oven to cool for an hour.


This is just a basic recipe and has so many possibilities.  The first thing that has no limits really is the extract.  Almond is usually the standard.  This will usually give you an angel food cake taste to them.  There is nothing wrong with that, but why stop there.  You can use orange, mint, lemon, strawberry... the list could go on.  I have just a few suggestions.  I have found out a few things after making them a few times.  First thing would be if you can, the pure extract will give a better taste then imitation.  I know pure extracts can be expensive, so if you rather not then I would suggest adding more or the imitation, increase the amount to at least 1/2 teaspoon.  You could also add more on the pure.  I usually do.  It comes down what you like in taste.  Another suggestion I have is try not to make them more them about 2 inches in size.  If you start going bigger, you are looking at longer baking time.  Something fun you could do is to add food coloring.  You can match the color to the flavor or the holiday you are making them for.  Just add the color in a little at a time until you reach the desired color.  You may want to go just a shade darker because while they bake the color fades some.

I hope some of you decide to try these easy to do cookies and my suggestions help.  I would be curious if anyone tries.

Until next time.... Happy Baking!


Thursday, May 17, 2012

Bunny Cupcakes

I know Easter was over a month ago and that means I probably missed the prime time for this post, but it is ok, I don't mind.

This was actually the second time I made these cupcakes.  The first time for some reason I never wrote a post about them.  I don't know why?  I must have had a 'Mommy Moment'.  I am use to those.  I am starting to get use to them, but I digress.  So, here is my first time making them two Easters ago.


Very Cute!

I just made simple yellow cupcakes, nothing too fancy.  The icing is buttercream tinted pink.  The bunny itself is just a rounded teaspoon of white buttercream.  The ears are very simple.  There are just two slices of marshmallows.  Now, the website I got the idea from dipped the ears into pink sugar crystals, but I didn't want to do that.  The eyes are tiny cupcake hard sugar decorations and the whiskers are writing gel.

I thought I would pretty much do the same thing again.  Why do I always think things will be easy the second time around?  Will I ever learn?  Nope I guess not.  Here is Number Two...


As you can see not the same.    For whatever reason the icing DID NOT want to work with me to make the head of the bunny.  So, I had to improvise with what I had.... marshmallows.  Each bunny is made from two slices.  One full slice is for the head.  Then I cut one in half to make the ears.  I do have one tip here.... Your everyday kitchen shears will work great, but just have a damp paper towel handy to wipe the blades once in awhile.  They will get very sticky.

I have done some other things recently, so I have lots more to share.

Until next time..... Happy Baking!
Saturday, March 10, 2012

White Chocolate Cake

A couple of weeks ago was my hubby's birthday, which gave more then enough reason to bake a cake.  My initial plan was to use the cake pan that I bought Valentine's Day, but he didn't want me to do use it.  So, it was to Plan B.  (Why do they need to make things difficult?)  Anyway, off to think of something else.

With it only being three of us, I didn't need to make anything too big.  I decided on a two-layered round cake.  Since he isn't to fond of regular chocolate, I decided to make a White Chocolate Cake instead. I was able to find a recipe on one of my favorite sites allrecipes.com.  Here is the link to the recipe if you would like to check it out for yourself... http://allrecipes.com/recipe/white-chocolate-cake/detail.aspx .  The recipe also has the how-to to make a icing, but I didn't use that.  Because hubby really like white chocolate mousse, I decided to try something with that instead.  There was the hard decision to make in whether or not cover the whole cake or not.  After some thought I decided to got with just a layer of mousse in between the layers and on top of the cake.  It was just enough icing for the cake.


Mmmmmmm!

The cake itself is bit more dense then most cakes I have made, but it was not heavy and sit in your stomach.  It did look like a regular White Cake, but definitely had the light chocolate taste to it.  And of course the best thing about the cake was the birthday boy loved it.  That is all that matters, right?

Until next time.... Happy Baking!


Sunday, February 26, 2012

Valentine's Cake

I know Valentine's was almost two weeks ago, but this is the first chance I got to write about the two cakes a made for that day.

About a week and a half before Valentine's day, a teacher at my daughter's school asked me if wouldn't mind if I would think of something to make for her and her husband for Valentine's day.  Of course I was more then happy to think of something for them.  This wasn't very hard because I was already eyeing a new toy I wanted, but had no reason to get it.  Now I did.

I wanted a pan that Wilton made that allows you to do this......


I couldn't wait to try the pan out.  I decided to make a trial run before the final product.  The final cake I would be making was a chocolate cake with white chocolate mousse and buttercream icing.  Something I thought that would have a very nice contrast.  But, for the trial this combination would not work because hubby isn't too fond of chocolate.  (I know... How dare he?  Everyone loves chocolate!)   So,  I needed to come up with something else.  Also, I didn't want to do the same old same old.  After thinking and surfing the web, this is what I cam up with..... Applesauce Cake with a Apple Mousse.

The trial was a 50/50 success.  The cake it self turn out great.  It is a little heavier then a regular was is fine.  If you like to try is for yourself here is the link http://www.marthastewart.com/340985/applesauce-cake .  I am not a big fan of Martha Stewart usually, but this was good.  The Apple Mousse.... well not so good.  The taste was great, but the texture was something to be desired.  It ended up being more like a thicker applesauce then a mousse.  Because of this, it made it interesting putting the cake together.  I was able to, but in the end the cake ended up soaking in much of it.  So, when I cut into we had a hole in the center of the cake rather then a nice filling.  Oh well!  Live and Learn!

The final cake came out much better.  L and her hubby were very happy the cake.  I only wish I could have gotten a picture to share with all of you, but she forgot.  (It is ok.  It just gives me another excuse to use the pan again.)

I have a few other things happen these past few weeks, but those are for other posts.

Until next time....... Happy Baking!